Archives

All posts by jrcrilly

final assembly

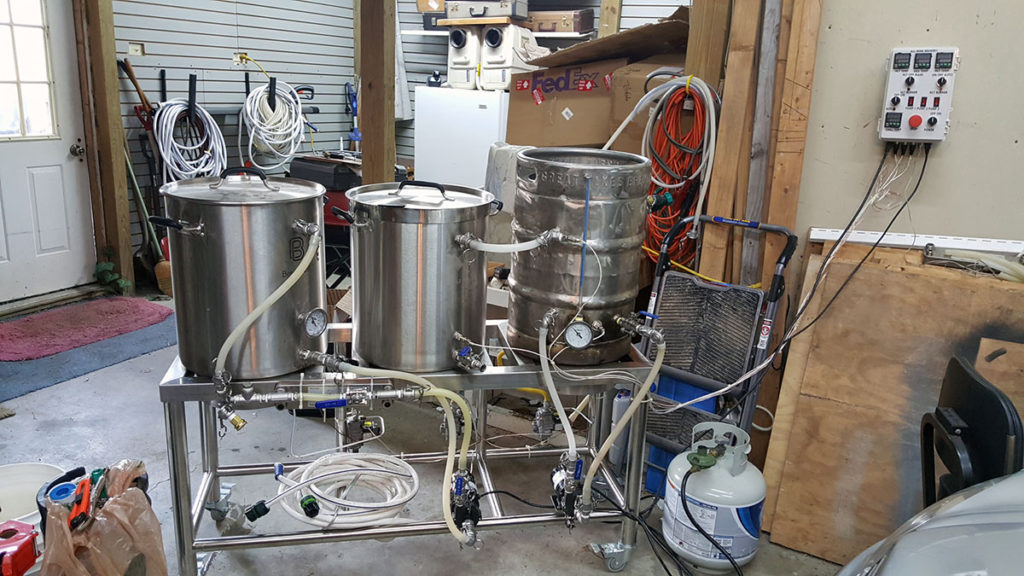
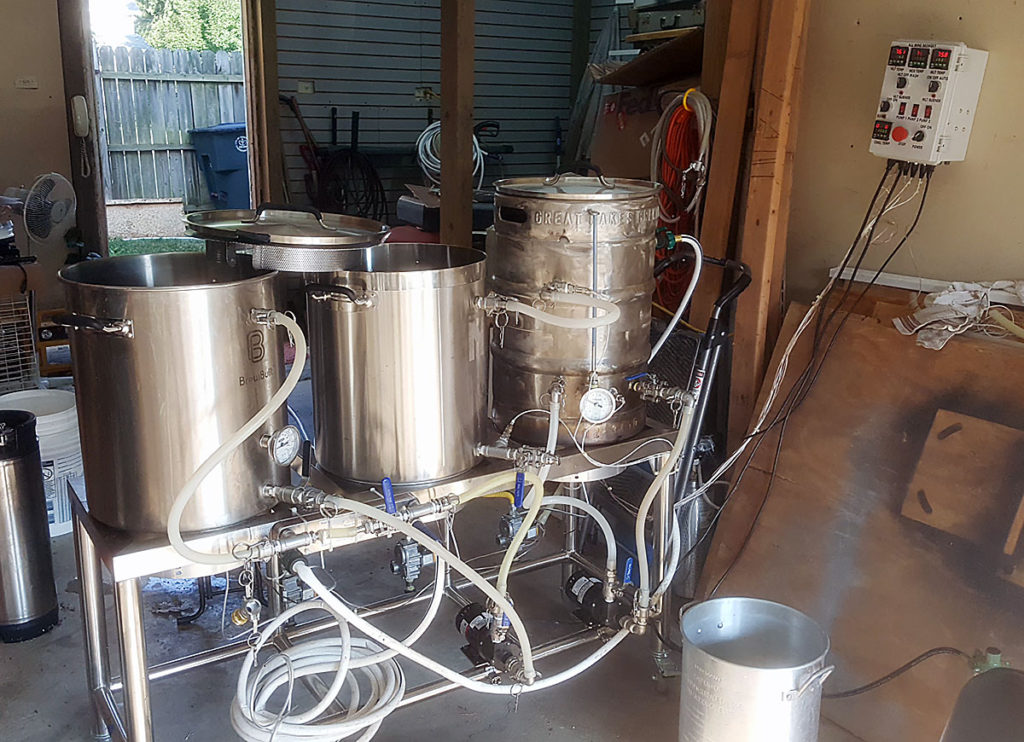
It looks a little neater now; I shortened all of the hoses for a cleaner setup. The third test brew yesterday went well, though the day was far too hot for it.  That was aggravated by the fact that I kept the door behind the rig closed this time. That killed the breeze that had provided some measure of relief on previous brews. That breeze was making it difficult to “dial in” the burners, as it was blowing right into the vented areas at the rear of each burner. Once I have the control box mounted on its own stand I will be able to position the brewstand to avoid that. As it is, everything is tethered to the fixed controller location so I don’t have much freedom of movement.

With the flames undisturbed I could make the area even less comfortable by cranking the burners up! Boiloff was initially higher than intended and I had to cut the boil flame down to avoid losing too much volume.  I haven’t yet weighed the propane tank but I expect fuel consumption to be down a little from the 7 pounds I used last weekend. I think I will end up around 3 pounds for a 5 gallon brew and 6 pounds for ten gallons. That would put me about where I was with the original gravity feed system I had been using; I can live with that. The burners can be switched over to natural gas by swapping a spring in each solenoid valve and drilling out an orifice in each burner. When I get around to that my fuel costs will drop greatly.

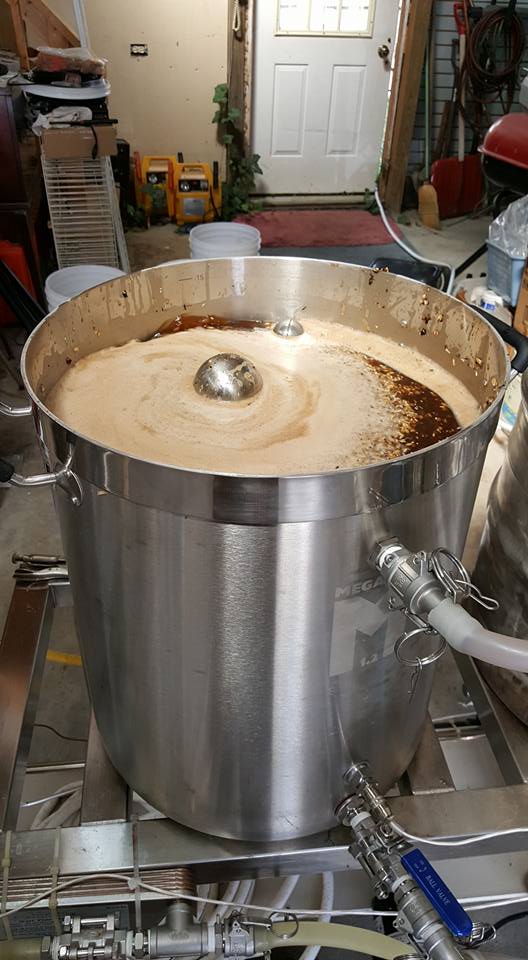
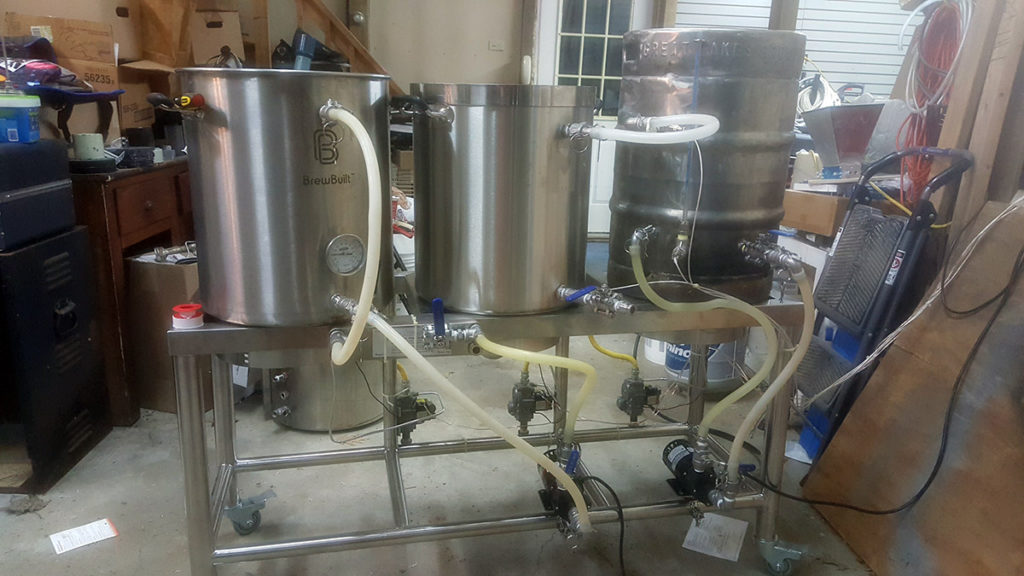
I don’t know at what temperature the ground water was, but I was able to get the boil kettle down to 75 degrees very quickly by recirculating through the plate chiller. Transfer into the fermenters was at 65 degrees. I doubt that the ground water will ever be much warmer than it is now, after a couple of weeks of 90 degree days so I should be free of cooling concerns.


13gallon mash

The second session went well.  It was, for me, a big batch of a big beer. I scaled up the recipe for the 10%abv Russian imperial stout that I have produced several times on the Z to ten gallons for this rig. No room left in the mash tun, but it all worked OK. Batch size is a complicated decision. I can spend all day in the barn and make either 5 or 10 gallons. It seems a no-brainer to choose to make 10. On the other hand, it is a hobby and I can brew twice as frequently (and have more variety) by selecting 5 gallon batches. Right now my perceptions are skewed a bit because I have been making 2.5 gallon batches all year so even 5 gallons looks like a lot of beer. There is no economy of scale with larger batches because (to my surprise) propane consumption doubled for the 10 gallon brew and ingredient costs are constant because I always buy bulk grains.

Meanwhile, the fermentation freezer is full. I don’t even have room for the 2.5g batch I brewed Friday so it is still sitting in a sink of cold water. I need to rack a couple of kegs from the freezer this afternoon. I’ll need to rack some more to make room for the brew I plan to do next weekend. Then I will be shut down until some more brews complete fermentation. Three weekends in a row on a conventional system is very unusual for me. I am just exercising the setup to make sure there are no surprises on the public brew day at the end of the month. Once a month will be normal, with small, low-effort brews on the Z to fill in the gaps.

debut

Did the first brew on the updated system today. It is a very different experience from using the Zymatic, which is all I have used since November. It is  a more modest change from brewing on my original three vessel gravity feed system, but a significant one. I can report that each design change ended up pleasing me. To anyone considering switching from gravity feed to a single tier system, or to HERMS, or to direct RIMS, or from a conventional counterflow chiller to a plate chiller, or to an Autosparge, or to PID burner control, or to a whirlpool setup: I encourage you to give it a go.

During today’s brew I found that I appreciated each and every upgrade from my original setup. There is no reason to think that any of the changes (or all of them combined) are going to suddenly make better beer – but I enjoyed having and using them. It is a hobby, after all, and if I am going to spend most of a Saturday doing it I want to enjoy it. The system delivered on that goal; I did enjoy it. Further, over the last few months I also enjoyed figuring out how I wanted to implement each change as well as the activity of putting the system together. I wimped out on building the stand itself as I don’t weld but I got to select each component of the system and put it all together the way I wanted to. It was rewarding to see each element performing as desired.

So: is it better than the Zymatic? It is certainly very different, and using it is a very different experience. The Zymatic is extremely easy to use while still giving the user complete control over the brewing process. One makes all of the same decisions – recipe, ingredients, mash temperature and duration, boil duration, hop additions, etc. It can then be left to its own devices to achieve all of these things, leaving the brewer free to attend to other matters. This compensates for the limited batch size (usually 2.5 to 3.5 gallons) by permitting more frequent brewing sessions. You don’t have to set aside an uninterrupted brew day. I use mine in my office and brew while conducting business.  This rig requires much more attention. I have to be there to tell it when to change temperatures. I have to be there to open and close valves and to move hoses and to turn pumps on and off. I have to be there to add hops at the appropriate times. I have to be there because from one to three large propane burners are operating most of the time and should not be unattended. I have seen some strong diatribes by those who feel that since the Zymatic eliminates much of this it isn’t “real” homebrewing. I don’t buy that; to me, homebrewing is about making decisions and implementing them. If the machine runs the valves and heaters under my command, the process is no less “pure” than if I stand there and perform the same functions by hand.

Conclusion: I like the Zymatic and will continue to use it, but less frequently (I have done 38 Zymatic brews since January). I have missed “normal” brewing and enjoy the hands-on aspect of using the new system as well, and will do dedicated brew days as time and weather permit.  Each has its place and fills its own role.

nearlythere


Had another burst of activity tonight despite high temps and humidity. Got two PIDs autotrained, both pumps mounted, and most hoses built and connected. I would have finished the hoses but have misplaced some of the connectors I had stashed. I’ll dig them out tomorrow (I hope).  Still need to train the third PID, mount the chiller RTD sensor, make up the last of the hoses, and make some changes that occured to me during tonight’s tests. Those will involve punching a couple more kettle holes but I have everything already set out to do that so it will be easy. I still haven’t found my old counterflow chiller so I’ll be using the plate chiller, which I hope to learn to trust as I use it. I always meant to switch over to it, but I trusted the counterflow chiller and hated to mess with that which works well.

Next stage, after everything works as it is, is to rig the (heavily) used 20 gallon Blichmann G1 pot I picked up for not much. It has LOTS of excess holes in it, including three 2″ triclamp fittings that were used for electric elements. I will have to cap a bunch of holes first, but the plan is to make it into a boil hettle so I can increase my max batch size. Then I can convert the existing 15G boil jettle into a hot liquor tank and get rid of the converted keg I am now using. I want to do it partly for esthetic reasons (I don’t like the looks of convered Sanke kegs), partly for ethical reasons (there is no easy way to tell whether a given Sanke keg was ever stolen but it is certain that some were), but mostly because I much prefer the fuel efficiency of a flat bottomed kettle. Once I eventually switch to natural gas it won’t be so big a deal, but I don’t know how much propane this rig is going to consume per brew session. The old rig rig used about 3-4 pounds per brew but it had smaller burners. I haven’t performed any meaningful delta-T tests but I observed about three degrees/minute heat rise in the MLT while recirculating through a HERMS heat exchanger that was exposed to room temperature air rather then to water at operating temperature. It should do better in service – and the other two burners are mounted closer to the kettles than that one so they should also do better. I never got three degrees/minute out of the old rig so this should be a nice improvement.

over all


I have been brewing indoors since January. The indoor system is really convenient but the batch size is limited to 2.5 gallons. A typical homebrew batch size is 5 gallons. My usual system can do 5 to 10 gallons and I have missed having that capacity. I tore it all down to upgrade and update it and never got around to completing the project. I made massive progress today, though. I installed the temperature sensors on the MLT, HLT, and heat exchanger and wired them all to the controller. I got all three pilot/thermocouple assemblies mounted, made new pilot gas lines for all three, and wired them all to the controller. I did the first test burns to test the pilots, thermocouples, and burners and all looks good. Just need to mount the pumps, make up new silicon hoses, add the autosparge and whirlpool fittings, and rig the plate chiller. You can see the test burn here: http://johnrcrilly.com/20160723_214848.mp4  (yes, I need to crank the gas down and the air up!)

The rig consists of three 10″ banjo burners running on low pressure propane and controlled by PIDs driving Honeywell furnace valves. There is a heat exchanger in the hot liquor tank so I can operate as a HERMS (heat exchanger recirculating mash system). There is a controlled burner on the mash/lauter tun so I also have the option of running it as a RIMS (recirculating infusion mash system). The kettles are 15 gallons so capacity is 10 gallons max.

lit rear

gsb-100

I had planned to wait until a few of the current projects were complete, but this Gonset GSB-100 popped up locally and I couldn’t resist. These were produced from 1959 to maybe 1962, so it is contemporary with the early KWM-2. It covers eighty through ten meters; SSB, AM, PM (functionally similar to FM), and CW. It is well designed except for using a TV sweep tube for a final, and for apparently using an inadequate power transformer (these had a high failure rate). This one is dusty, but is in great cosmetic shape and appears to be complete. If the transformer is OK I should be able to bring it back to life. It will be a perfect match with the vintage homebrew amplifier I am refurbishing (using four 811-A’a and mercury vapor rectifiers). Someday I will need to come up with a communications receiver with which to mate it. Gonset didn’t make anything satisfactory so it will probably be a Hallicrafters or Hammerlund from the late fifties or early sixties. Maybe a 75S-1? A 75A-4 would be a better match (though not quite contemporary), being about the same size and also having a rotary drum dial – but the collectors have inflated prices on those far beyond their intrinsic value.

No photos this time, but the observatory should ready to move into again. New roof, new South wall, new drywall (Thanks, Scott at backyardobservatories.com ). Just need to paint the interior and get some gear mounted onto the pier which is still in place. I am not sure what I will install, but it will be lighter than what I have had in there in the past. The days of hauling 70 pound mounts and 50 pound optical tubes up the stairs are over for me, so no more Tak NJPs or 12″ RCs. No more LX-850 and 12″ enhanced SCT.  I have a couple of high quality small refractors available, and a Vixen GP-DX that would carry them with grace and style, so it will probably be something like that. I have a better Canon DSLR (T2i) than the one I used all those years ago (original Rebel) so I think that will do to get me back in action for widefield shots. Might pick up an 8″ SCT for longer focal length work, or the very economical and effective Astrotech 8″ RC.

The setup will be very modest compared to what has been installed in the past, but should be enough to keep me active.

heathtwins


The first “serious” station I owned was the Heathkit SB-301/401 combo. I enjoyed contesting in the early 70’s and these, along with a home brew amplifier using a pair of 4-400A’s, did a fine job for me. I also had an Eico 730 modulator connected to the SB-401 finals in a plate modulation scheme so I had real AM capabilities; not a common thing in the 70’s. Many rigs of that era included the AM mode, but it was usually a low level thing, not much more than unbalancing the balanced SSB gemerator. I also had the matching SB-500 two meter transverter, which I used to communicate through AMSAT-Oscar satellites 6 and 7. All in all, I got more use out of the Heathkit twins than any other equipment I ever owned. It is no wonder that I would like to have a set of those twins available again.

I violated one of my own rules in acquiring this particular pair. I don’t mind repairing or refurbishing communications gear but don’t like to get involved in finicky cosmetic re-work so I usually look for gear with no external flaws. The receiver above has had its cabinet painted black at some point. This might have been done to match the blackout SB-200 that was offered one year. Still, the front panel and lettering are excellent and there are no dents. It won’t be very challenging to shoot the cabinet with a close enough color match. If not, I should stumble upon a replacement cabinet sooner or later.

I may actually get an antenna or two up tomorrow. If so, I’ll be busy setting up the FTDX-1200 station and running power, grounds, and coax for a little while. Then I can start getting some of this vintage gear whipped into shape. I have an extra desk with a riser in the office, so I should be able to have the Yeasu, the KWM-2, the S-38C, and the Heathkit twins all set up together at some future date (after everything is working, of course). I suspect there won’t be room there for any more projects. That is OK; this will be enough to keep me busy for a while. I suppose I could set up an alternate station in the upstairs office, as there is an extra desk there as well. I had originally planned to set up the station on that desk; the Yaesu and Kenwood transceivers are on there now – but I think I would enjoy it more downstairs. I can have a much better RF ground there, too.

20160526_174035[1]


Dunno how much time I’ll be able to commit to these, so I don’t know when I’ll have results to share. As shared on a previous post, the S-38C is an attempt to reexperience my very first shortwave receiver. The KWM is an attempt to approximate my primary station from the 70’s, which was a Collins S-line (32S-1, 75S-1) from the early 60’s. The KWM-2 was the platform from which Collins derived those. The  S-1 line design and performance were very similar to the KWM-2 which spawned it. The later S-3 series (32S-3, 75S-3) from the late 70’s was a significant upgrade but I never owned those.

I wanted to find an S-1 pair (and may still, some day) but the collectors have really grabbed those up. The KWM-2 is much more available because it was produced in far greater numbers (many were placed into military and commercial service) than the separates (which were marketed only to the ham radio market segment). This should satisfy my desire to experience the S-1 line again, while using up less space and tying up less money. I haven’t yet attempted to date this one, but until I do I’ll call it a 50’s project as this model was introduced in 1959. I admit that it is probably from the 60’s. The model was produced into the 70’s, but a logo change took place somewhere along the line and this one has the earlier badge so it’s not a later unit. Once refurbished, I’ll use it as a backup station until I have an opportunity to swap it for an S-line inj need of attention.

My other 70’s station that I would like to re-create was Heathkit’s later homage to the S-line, the SB301/401 pair. The design, styling, and functional arrangement were very obviously modeled after the early S-line. Mine worked great, but was eventually replaced by an S-1 pair, despite that gear being at least ten years older.  I probably never managed to put as many hours on the S-line as I did on the Heathkit pair, as I owned those during my peak active years. The good news is that these sold like hot cakes and there are plenty of them out there. The prices have remained modest; I won’t have any trouble getting a set of Heathkit twins put together.

All this vintage gear will be fun to have around, but it is already obvious that modern gear has the whole DSP (digital signal processing) thing figured out. As good as the S-line receiver was, and as rosy as my memory of it is, the FTDX-1200 with DSP has  a vastly superior receiver. I have spent lots of time listening on that, using a short random wire on the floor. I am getting closer to getting a real antenna erected so I can hear better and also transmit. Antennas will be modest, as I am now on a very small downtown lot. I have made up a multiwire dipole that should get me on 40 through 10 meters (no WARC) and may get that strung this long weekend. I picked up a trapless vertical antenna for 20 through 6, including WARC bands, but I don’t yet know where I will place it so it may be a while before it goes up. When it does, I’ll be ready for my first-ever WARC band activity. I was never equipped for those bands before.

sb-500


Most hams have probably never seen one of these SB-500 two meter transverters. No, I don’t have one (actually, I do have one but it will need to be refurbished), but I did have one back in the day. In the early 70’s the 2 meter ham band was still mostly AM (Johnson and Gonset radios come to mind – and of course the Heatkit lunchbox) but FM was on the rise (usually with converted low band land mobile radios). A few weak-signal fans were using CW. Pretty much nobody was using SSB, though, and when Heathkit introduced the SB-500 it did not create a firestorm of interest. It took in a signal from a ten meter (28MHz) transmitter and heterodyned it up to 2 meters (144 MHz), retaining whatever modulation was present.  Then it transmitted the new signal. Anyone with a ten meter SSB transmitter could rig  one of these to generate a two meter SSB signal. It was a turnkey setup if you had the SB-401 transmitter with which it was designed to mate. Like most, I wasn’t excited about it but approved of the idea in general.

That changed for me when Amsat-Oscar 6 was launched in 1972. This satellite, built by amateur radio enthusiasts, was in a low earth orbit similar to the weather satellites. One of the things it could do was to take in a span of spectrum (100KHz, I think) in the two meter band and translate the whole chunk down to ten meters and retransmit that span, including whatever signals were there. Thus, a whole group of people could be simultaneously using the system and each could be involved in his/her own conversation. That looked like fun! The satellite’s power budget was extremely limited, though. Only efficient modes of operation were permitted. This meant CW or SSB; I was equipped for neither on two meters.

I was using the Heathkit SB-301/401 on HF, though, so the SB-500 was a perfect solution. I managed to pick an SB-500 locally and after some work had it operational. I rigged omnidirectional antennas for the uplink and downlink frequencies and began listening. The satellite had an orbital period of around 110 minutes and an overhead pass lasted maybe 20 minutes. The inclination was such that I could usually hear two consecutive passes (three if the middle one was directly overhead).  I used both CW and SSB and had many enjoyable contacts through Oscar 6.

While Oscar 6 was still operational, Oscar 7 was launched. It had new capabilities but still had the 2 meter/10 meter translator so my setup worked well with both satellites. I had a lot of fun with both. I shut down my “ground station” when I relocated and never got set up for satellite work again but kept up with happenings. Eventually the batteries on Oscar 6 failed so we were down to one satellite. Around 1980 Oscar 7 also went silent due to a battery failure. Nearly 20 years later, someone noticed that it was back up! A shorted battery had put it out of commission but when the battery eventually rotted away it left an open circuit and the solar panels could again power the system. There is no storage, of course, so when the satellite is in Earth’s shadow it shuts down but most of the time it is up and fully operational despite being over 40 years old!

Clearly, I need to rig something to listen for the 10 meter downlink. I suspect that when I have done so, I will get the bug to relive my experiences all those decades ago and actually use it. The good news is that it will be much easier to set up a 2 meter SSB/CW rig these days.