S-38c


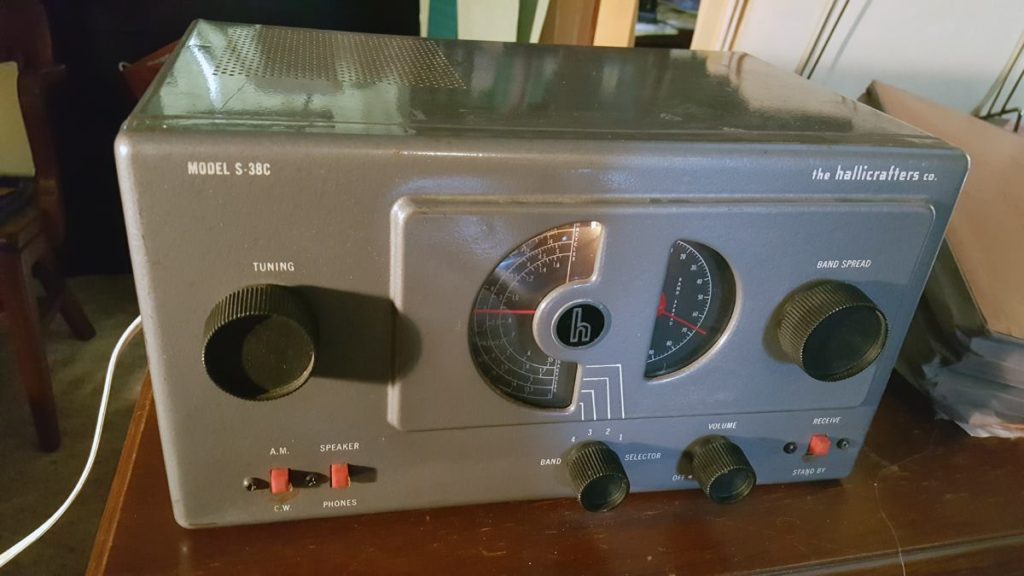
This arrived recently. Background: the first shortwave receiver I ever owned was a 1952 Hallicrafters S-38C. It was about ten years old at the time (as was I). Dunno what happened to it. Every five or ten years I wonder whether I should try to obtain one for old time’s sake. This time I did. Looks great, but (of course, for $20) doesn’t work. Into the project pile it goes – maybe with a little extra priority. Come to think of it, I think I paid $15 for the first one, and it worked…

The next receiver was a Heathkit GR-64 in 1968 or so. Bad mistake; I haven’t felt any nostalgia for that one. I built it to be the receiver in my first Novice station. It wasn’t a very good performer in that application (though it was better than the S-38). I was seduced by the features and glossy appearance but I soon realized that I should have selected the HR-10 instead for ham use. I don’t think I’ll be looking for a GR-64 to cherish.

When I got my General class I picked up an Eico 753 SSB/CW transceiver. It was better, but not well respected in the ham community. Then a few other transceivers until I got my next separate receiver. This one was designed for amateur use and was loosely modeled after the very highly respected Collins 75-S series receivers. It was a Heathkit SB-301 and worked alongside its companion SB-401 transmitter for several years until both were replaced by the Collins S-line (75S-1, 32S-1) it emulated. I don’t remember what happened to the S line, but that was the last tube receiver or transmitter that I owned. I could easily see me grabbing a set of Heathkit twins or an S-line again just to enjoy having them around.

Automated small-batch brewing appliances have been around for a little while. The first to hit production was probably the Picobrew Zymatic, which makes 2.5 gallon all-grain batches using conventional ingredients and sells for about $2000.  The next to reach production will probably be its little brother, the Picobrew Pico, whose Kickstarter campaign was extremely successful. The first production units, originally predicted for March shipment, should be going out fairly soon. Given that their first Kickstarter project resulted in the Zymatic, a product that has been delivered in decent quantities (well over a thousand),  it seems likely that the Pico will come through. That one is half the price (and half the production quantity) of the Zymatic. It is much smaller, too. The big difference is that, although it is an all-grain system using “normal” ingredients, they can’t be loaded directly into the machine. Ingredient packs must be acquired from the vendor. They have acquired the rights to a fair number of popular craft brews and their in house brewers, who  have created a large library of recipes for the Zymatic, are busily converting those to Pico packs as well. They are also aggressively pursuing independent homebrewers for their recipe development program. It appears the Pico owners will have no trouble obtaining recipe packs that will please them – but this one isn’t going to be nearly as attractive to homebrewers as the Zymatic. They (we) like to use the ingredients we already have on hand (and generally buy in quantity to control costs). It should be a pretty cool item for a non-brewing craft beer drinker, though.

The Brewie is a riskier proposition; it isn’t yet in production and the company can’t point to a previously successful brewing appliance as Picobrew can. Pre-orders are $1600. If successful, it will do 5 gallon batches, and you can use your own ingredients.  I don’t feel very confident about that one.

The next contender’s Kickstarter project just went hot today. The Artbrew will be about the same price as the Pico (though adventurous Kickstarter supporters can snag one for $490). Same capacity as the Pico, too – but with the ability to use your own ingredients. It seems to be one to watch. There’s no history to look at, but the price seems right for what it offers. If successful, it will offer features not available in the Pico, such as internal chilling to fermentation temperatures, as well as maintaining proper temperatures during fermentation. That last bit is important, especially for casual or careless users, as poor management of fermentation temps is a frequent cause of poor homebrews. It is more of a crossover machine, probably directed primarily toward the craft beer crowd yet offering homebrewers the option of using their own recipes and ingredients.


picopalecloseup


Newsflash: neither of my entries in the AHA national homebrew competition made it to the final round.

It was an extremely mild and pleasant winter here, but also a very busy one. Between relocating the office, Dad’s broken hip, and reverting to a solo practice in which I do everything myself, I haven’t been inspired to write here. There are developments, though.

The brewstand described in the previous post has arrived and is nearly ready for action. The burners amd gas manifold are installed; just have to mount the pilots and thermocouples now. Then I will be able to do normal 5/10 gallon brews in the garage again. Parts one and two of my build article are posted on homebrewtalk.com . Part three will be the final installment after the project is complete.

I have been using a Picobrew Zymatic in the office for indoor 2.5/3.5 gallon all-grain brews. With 15 batches under my belt on that setup, I’m ready to review it when writing time permits. It is a great little system and I plan to use it whenever weather or time don’t permit full, outside brew days.

Current favorite brews: a clone of Pliny the Elder IIPA, a clone of grapefruit sculpin IPA, my house pale ale, my house vanilla porter, and a clone of Yeti RIS. I know, I need to get more of my own recipes into the rotation when time permits – but the clones are so darn good and I only have five taps!

I’m going to make a real effort to post something here biweekly so folks don’t get the impression that it is an abandoned page. I plan to describe a typical Zymatic brewday. I also want to write a little about some new toys, such as the digital refractometer and the pH meter.  Of course, I’ll have to write about the first brewday on the big rig whenever that is complete. I thought I was going to finish building that this weekend, but there’s a lot of paperwork that will need to be done today instead.


panel2

Got the panel built. I made a few changes from the initally proposed layout, mostly for cosmetic reasons (and, speaking of cosmetics, I WILL be cleaning up some of those rough edges at some point!). I changed to illuminated rocker switches for the pumps and main power to simplify the panel. I changed the chiller output temperature display to a (mostly wasted) PID to reduce panel space usage and to match the PIDs that are actually being used as PIDs. The panel is reasonably uncluttered and should look OK once the lettering arrives and is applied. The bottom panel is a little busier than I had in mind but all of the inputs and outputs are required so it is what it is.


Here’s the front of the panel with a legend of device functions:

panel1 with legend

Now the holdup is the new stand. I expected it weeks ago but haven’t yet received a firm shipping date (just a series of “next week” predictions).

layout testlayout test WITH FUNCTIONS

Phase one is the construction of this control panel to operate the three burners, heat exchanger, and two pumps that will be installed. Three Mypin PID modules will operate the burners via Honeywell solenoid valves. The Inkbird at the bottom is being used only as a display device. I plan to have the panel cut, the devices mounted, and the wiring completed over the next two weekends


Note: I see that I set up the new URL as a redirect so the browser still displays the old blog name. I’ll switch it to a mirror so it shows the new domain name when I’m in a really good mood and time permits.

The great LX850 experiment is complete. I kept the mount significantly longer than usual, which should be interpreted as a hint that I liked it. It performed as expected every time I used it over a period of 2 1/2 years. I captured plenty of images. Now it’s time to move on. In this case, it is really time to move over.  I don’t want to commit to any particular astronomy activities. I’ll put one of the other mounts in the observatory and do some casual DSLR work as time and interest permit, but probably nothing worth writing about. Instead, I’ll be using this blog space to talk about homebrewing because that is what interests me now. I may preserve the astronomy posts in one blog and transfer the brewing posts into a separate blog, or I may leave them combined here. The new URL is www.allminebrewery.com but for now that just takes you here.

Question-Mark-Icon-800px


It’s time to begin the final stage of renovations to my home brewery. I’ll be switching to a one tier brewstand with all temperature-controlled burners and a stainless steel mash tun instead of the modified beverage cooler. I’ll be using the same stainless steel boil kettle and HLT/HERMS that I’ve been using. It won’t make better beer, and it won’t make beer faster, but the intent is to make the process more enjoyable and, perhaps, more consistent..  The plan is to do the first brew mid- or late November.

newherms


Brewed my standard American pale ale today (a tamer version of Sierra Nevada pale ale). I always keep some of this around but I was a little careless and ran out this week. Now I won’t have any available for a few weeks. I wanted to make a larger batch but since I was testing the new heat exchanger I decided it would be more prudent to keep it down to a 5 gallon batch in case there were any complications.  The new heat exchanger worked great – the 1/2″ tubing permitted much better flow and the system responds much more quickly.

I’ve been using only welded keg fittings until now but I installed these weldless fittings myself and they are perfectly sealed. I won’t hesitate to drill any needed future holes in the kegs. I’ll need at least two in the near future; one in the boil kettle for a whirlpool inlet and one in the hot liquor tank for a thermowell. Please ignore the soot on the keggle; I had tried to soup up the HLT burner and got the orifice too large. After a couple of brews the keg looked like this so I went back down to a smaller orifice. It provides more heat amd no more soot. I just haven’t cleaned the old soot off yet.


I ordered the ingredients for my next brew today. It will be a clone of Ballast Point’s grapefruit sculpin. I’m not an IPA fan generally, but that one is wonderful.

hermstest

It isn’t pretty, but it made three batches this weekend. I wanted to see how it would do before drilling additional holes in the hot liquor tank to mount and connect to a better heat exchanger inside. The primary reason for HERMS is the temperature control it provides to the mash without the risk of scorching it by direct heating. I can’t point to any science that proves that recirculated wort is better in any way, but it certainly looks prettier – nice and clear. I enjoyed both features this weekend. An indirect effect is that since there is a pump already there, it makes sense to use it to transfer fluids between vessels. That means that there’s no need for a three tier gravity feed brewstand.

On a side note, I’ve been tuning up the old propane burners (changing regulators and orifices) in an effort to reduce heating time. It used to take a long time to heat up the mash strike water, and even longer to bring the end result to a boil. The good news is that I have substantially reduced heating times on both burners. The bad news is that propane usage is way up. I burned 19 pounds of propane this weekend doing three batches. I used to use about 4 pounds per batch.  The new burners should be much more efficient due to the greater surface area. Better yet, they can easily be rigged to run on natural gas (MUCH less expensive than propane – and no trips to the refillng station).


pumptest

This is a bunch of unrelated stuff all connected together for initial cleaning/testing. That’s a March 809 pump at the bottom. It’s temporarily bolted to the three tier stand, though with the pump I won’t need that stand any more. Just wanted to test it and run some pbw through it. It is fed by the mash/lauter tun and is here running the “mash” (pbw) through my old immersion wort chiller, which is temporarily hanging inside the hot liquor tank.  It will be used as a HERMS hex until the new, dedicated SS HERMS coil gets mounted in there. Then the “wort” goes through the counterflow wort chiller, which doesn’t belong anywhere in that fluid chain but I figured I may as well clean it while I’m circulating pbw. Then back into the MLT  to be recirculated. The counterflow chiller will be removed but the rest will be used as a test bed tomorrow to see how effective the HERMS is at controlling mash temps while I brew a robust porter (and, if time permits,. also a holiday spice ale).  The plan is to combine this hardware with a new one or two tier stand with temperature-controlled burners. I’ll switch out that cooler MLT for a kettle MLT at that time. I’m just trying to keep this old rig operational as long as I can while working on the next gen rig.